Monday, August 31, 2009

Choo Choo!

Good morning! I stole a few minutes this morning to finish a card I started on Saturday morning. I spent the day yesterday sick with the flu (Michelle was sick the night before), so I didn't even feel like making cards! But, everyone is feeling much better today (in fact, the kids have now been sleeping for 12 hours), and I'm on the papercrafting scene once again!


One of my friends from high school that I have reconnected with through Facebook is having her fourth baby this week via cesarean. I wanted to make her a gift (more coming later once I know the baby's name), and knowing that she's having a boy made it easy to make a card!
I used the recent sketch from the Midnight Madness Sketch Challenge (it's #16), which you can find here on Priscilla's blog. I saw someone's entry on SCS, and loved the sketch.
I turned it on its side to better fit my card theme. I struggled with the flourishes in the corners, so instead, I omitted them and stuck a few trains at the bottom.
It's really hard to tell (I don't know if my Versamark is drying up or what), but I used the print pattern background stamp on the blue layer, and used crosshatch on the yellow and red layers. All very hard to tell. Thanks for stopping, and Happy Monday!


***ingredients***
Paper: CM paper stack-blue, yellow, red, generic white, generic black
Stamps: Gina K-Wee Tees, SU! Crosshatch, SU! Print pattern
Ink: real red, only orange, brilliant blue, versamark
Other: ribbon (offray), sponges, colored pencils
****************

Saturday, August 29, 2009

Card for Grama Ann

Good evening! Just a quick card I made last night.

My great-grandma ("Grama") was in the hospital recently and we weren't sure how things were going to turn out. She's doing better now, but I am unable to go see her (she's in TN). So, I thought I would send her some paper flowers instead!

This sketch is for Viva La Verve September Week One. The twist was little round things. I used three pearls in the top left hand corner. I love my patterned paper and the waves---it was done with my long forgotten creative memories wavy trimmer. I embossed the sentiment with white ep. I never really was a fan of this set (Floral Whimsy), but it's really growing on my after this card! Thanks for stopping!


***ingredients***
Paper: SU! Bella Rose, PTI Dark Chocolate
Stamps: Verve- Floral Whimsy
Ink: versamark, certainly celery, real red
Other: white ep, sponges, cm wavy trimmer, ribbon (offray)
****************

Friday, August 28, 2009

Husband Emergency Card Stash

Hello! I finished my project!! Check it out:


This is the box that will hold the emergency card stash (obviously). I used the tutorial for an A2 Card Box from Splitcoaststampers (under "Resources"). I first used a pizza box tutorial that I found online, but once I got it all made and decorated, it didn't hold all the cards! Doh! So, I cut the decorated top off, whipped up an A2 card box, and stuck the top along with some scallops onto the top of the new card box. Clear as mud, huh?
Here is the list of what will be in the card stash. You can find most of them on my blog in the past few days.
1. One birthday card- for wife
2. One Valentine's Day card- for wife
3. One Anniversary card- for wife
4 and 5. TWO Just Because card- for wife
6. One "It's okay"/Sympathy/Empathy card- for wife
7 and 8. TWO Mother's Day cards- for wife and mother/mother-in-law

There is a total of eight cards in the box. The challenge with the box (other than the dimensions) was to make it masculine. I love how the words turned out (they are from SCAL and my cricut), and the background pattern from Technique Tuesday is one of my favorite stamp sets! Thanks for looking- hope to post something more tonight!

Kayla

***Ingredients***
Paper: SU! Bashful Blue, basic black, white
Stamps: Technique Tuesday "Irony"
Ink: versamark
Other: ribbon (offray), cricut, scal, free font: cooper black and comic sans, corner rounder for scallops
*****************

Thursday, August 27, 2009

Husband Emergency Cards

Hello! I've finished all the cards for my husband emergency card stash...I'll get the packaging made soon and put it all on here.
But, in the mean time, here's the last two with details:

This card is the Valentine's Day card. I used the sketch from SCS's sketch challenge 243. It was a little intimidating at first, but once I chose the bella rose paper, it was easy!
***ingredients***
Paper: Bella Rose DSP, PTI Dark Chocolate
Stamps: Wild Rose DD
Ink: positively pink, green galore, ranger distress walnut stain
Other: sponges, corner rounder for scallops
****************
This is the last of them; it's another Just Because card. I used a sketch from Markie's Mom's blog (see card here)--I saw it this morning and love it!! I also used the color combo challenge from Dawn McVey's Raspberry Suite blog. I've never played this challenge before, but it was fun! You can see the colors here: Color Challenge
I used Spring Moss and Razzberry Fizz (instead of Hibiscus burst) from PTI, SU!'s Flowers for You DSP instead of Melon Berry, and a generic cream. I love these colors together!!
With the sketch and the colors, it was relatively easy to put together! Thanks for stopping!
***ingredients***
Paper: PTI Spring Moss, Razzberry Fizz; SU! Flowers for You, unknown cream
Stamps: Happy Harmony, Verve- Flutterby
Ink: positively pink
Other: pastels, ribbon, fiskars heart punch, dimensionals
****************

Tuesday, August 25, 2009

Viva La Cards!!!

Made quite a few cards this weekend. I decided to make a Husband Emergency Card Stash card set for the craft fair. Basically, it has all kinds of cards for the man of the house to give to his wife and mother and mother in law for various occasions. I'm not going to post them all here, but when it's complete, I'll give you the full list. I'm about 3/4 of the way done, so expect it soon!

Mojo Monday sketch. This is an anniversary card. The quote says, "If you live to be 100, I hope I live to be 100 minus one day so I NEVER have to live without you. -Winnie the Pooh". So cute!

***ingredients***
Paper: SEI Chocolat
Stamps: Verve- Beautiful You
Ink: positively pink
Other: ribbon, dimensionals

****************

Another husband card. This is for his mother or mother in law for mother's day. Got the top note die from a site online (can't remember, though--I'll hunt).

***ingredients***
Paper: unknown brown, taken with teal, PTI Razzberry Fizz, Lemon Tart
Stamps: Verve Because of You
Ink:versamark, tempting turquoise
Other: white gel pen, top note die from internet, corner rounder for scallops, gold ep

****************

The other mother's day card for husband stash. Love this top note die shape!! I used the negative image from the previous card and just matted some PTI Razzberry Fizz Remix paper inside.

***ingredients***
Paper: unknown brown, taken with teal, PTI Razzberry

fizz remix, lemon tart
Stamps: verve- because of you
Ink: versamark
Other: pastels, top note die, ribbon

****************

Viva La Verve August Week 4: twist was to use favorite color combo. I love black and pink and teal. They look so bold!! It's hard to tell in the picture, but I stamped the dots from Delight in Life and emobssed them with clear ep.
***ingredients***
Paper: Basic Black, taken with teal, razzberry fizz remix
Stamps: delight in life, both ways blossoms
Ink: versamark
Other: clear ep, ribbon, pastels, dimensionals
****************
Thanks for stopping! Good night!

Welcome Signs #3 and #4

Good evening. Two posts today--I've been crafting, but too busy to blog. My sister in law and I just put up another 94 quarts of sweet corn today (we did 74 last week), so I have hardly been home!
I finished my signs for the craft fair. I LOVE how they turned out. I can't wait to get more.

Another welcome sign. The "welcome" was a bear to cut on my cricut. I think my mat is old, my blade is shot, and I'm a dummy. LOL I had some trouble! Again, got the flourish free from a My Cricut Scrapbooking online. I think this turned out very tastefully!

I chose to make the last one a thanksgiving/fall sign. I love the font that Thanks is written in (Liorah BT), and it cuts beautifully! I stamped the pumpkins on Only Orange, stamped the leaves on Green Galore, and then cut them all out. I used a gel pen to create the white "stitching". I also "stitched" around almost all the other pieces--I think it gives it such a homespun feel.
Thanks for stopping!! Have a great night!
Welcome sign
***ingredients***
Paper: SU! flowers for you, unknown cream, unknown brown,
unknown green, PTI Spring Moss, SEI Chocolat
Stamps: n/a
Ink: n/a
Other: cricut, scal, free font: Liorah BT, arial; flourish free from
My Cricut Scrapbooking, sign from dollar store
****************
Give Thanks sign
***ingredients***
Paper: PTI Summer Sunrise, SU! real red, dsp from flowers for you,
unknown brown, only orange, green galore
Stamps: Autumn Harvest
Ink: Only orange, green galore
Other: cricut, scal, free font: liorah bt, arial, white gel pen, s
ign from dollar store
****************

Thursday, August 20, 2009

Viva la Fairies!!

Hello and good evening! Another quick post for today...
I finally got up to making this week's Viva La Verve sketch with a twist (check out the new badge on my sidebar!!). This week's twist was to use a tag. I'll admit, I was very, very intimidated! That's why it's Thursday and I just now am getting it done!

I wanted to use Dreams and Dragons again, and I love this luscious paper by SEI (Chocolat). It's delish. A few notes:

1. It's hard to tell, but the brad is covered in glitter (I used a glue dot and stuck it in loose pink glitter--very fun).

2. The background strip is a shimmer sticker from the SEI pack, as is the tag (not a sticker, though).

3. The clouds are embossed in Seafoam White ep and covered in stickles.

Thanks for stopping!!

***ingredients***
Paper: SEI Chocolat
Stamps: Dreams and Dragons
Ink: Positively Pink, Gable Green, Ranger Distress Walnut Stain
Other: stickles, brad, loose glitter, glue dots, white ep
****************

God Bless This Home-Sign #2

Good afternoon! Here's another project I completed this afternoon (and the kids are still snoozing!!). It's another home decor sign. The more I do these, the more I wish I would have bought every one Loopy's had. But, I'm confident they will go on sale again after the fall season. Who knows- maybe they will be 90% off instead of 75% (hey, a girl can dream!!)!

I really, really like how this turned out, but it was a pain in the tush to get it right. Here's the story:
After I cut the paper, I had second thoughts about the color scheme. I consulted my mom, who assured me that it would be fine. Let's hope so.
Then, I couldn't get the words to cut right. I was using a different font, and I tried to cut it like 6 times. I adjusted everything I could think of, and it still didn't work. I put it away and came back to it later. I was going to just make the "bless" in this font and then have the other words in a normal serif font, but then I realized how beautiful this font was--it was exactly what I was looking for!!
The trouble didn't stop there. Once I finally got the words cut, I didn't think they were going to fit on the sign. But, I rearranged and rearranged some more, and I think it worked out nice. I actually like the G dipping into the rose.
So, what should have taken me about 1/2 an hour took me 1/2 a day!! But, it's done, and I love it!
Thanks for stopping!!

***ingredients***
Paper: PTI Razzberry Fizz Remix and Lemon Tart, SU! Pretty in Pink
Stamps: Wild Rose
Ink: Positively Pink, Real Red, Gable Green, Glorious Green
Other: clear ep, versamark pen, scor-tape, sign from Loopy's Dollar, cricut, font: Liorah BT
****************

Wednesday, August 19, 2009

Welcome Sign #1

Another quick entry (trying to keep up as I make things). I whipped this up this afternoon. I'm involved in a ladies church group, and we have a Harvest Sale every October to raise money for our school. I made this as a contribution for the Harvest Sale. I'm planning on making some more to sell. I love how this turned out!
I got the actual signs at Loopy's Dollar in my hometown. They were having crazy days, and it was 75% off...so it was 75 cents!! What a steal. It originally came with a metal piece attached that said "welcome" or "welcome friends" or something like that. I bought four of them, and ripped the metal piece off.
I was left with a blank slate! I mod podged some paper on, cut letters and the flourish with my cricut and scal, slapped them on, and I was done! Super easy, but looks really cool. I'm in the process of another one. Would have got it done this afternoon but the baby woke up. Tomorrow, maybe!

Thanks for stopping! Have a great night!

Kayla

***ingredients***
Paper: SU! Flowers for You (I think?), unknown green, unknown brown, unknown cream, PTI Spring Moss (letters), SEI Chocolat Noisse (flourish)
Stamps: n/a
Ink: n/a
Other: sign from Loopy's, mod podge, cricut, free font: pavane, flourish from My Cricut Scrapbooking
****************
Posted by Picasa

French Braid

Just a quick post today...Michelle wanted me to braid her hair last night before bed. I'm only a novice french braider, but I braid my hair every other day about, so I'm getting better. This is the second time I have braided her hair. Her hair was pretty dirty (she hasn't had a bath for a few days!...took care of that this morning!), so the braid held better. She was so excited. It looked horrid this morning when she woke up, though.

Have a happy day!

Kayla
Posted by Picasa

Tuesday, August 18, 2009

Micah's Rug

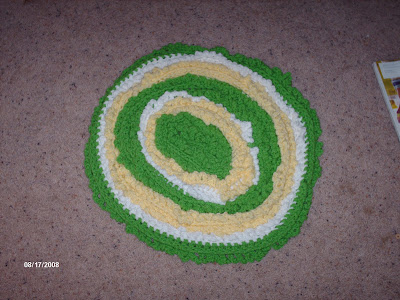
Well, it's finally done. I set my mind to it, and I did it!!!

The story: When we lived in our house in Alvord last year, the nursery was painted this beautiful green and white. The bedding that I chose for the new baby (Micah) was ducks and frogs (green, yellow, and white). It was darling. The floor was hard wood laminate (lighter color), and the room itself was very small. It was only big enough for the crib, dresser, and rocking chair. The perfect nursery. {sigh} I loved it so much that I took the can of green paint from the basement (hey, we owned it, right?!) with us when we moved so that I could paint our new nursery (whenever we own our own home again) the same color.

Anyways, I always wanted a rug for that room to lay in front of the crib. The hardwood got so cold in the winter, I thought it would be homey. I could never find the right color and shape, though. Anything close to what I wanted was outrageously expensive. So, when I learned to crochet a few months ago, Mom gave me a book with a pattern for a rug in it. I fell in love and decided to make it. It took me 2 months, and it looks hardly anything like the sample in the book, but I still love it. It's mostly for show, which is nice, because it's functionality level is very, very low!! Here it is:

Ta-da!! Awesome, right?
Here's another view so you can see the texture. I really love it the more I look at it!
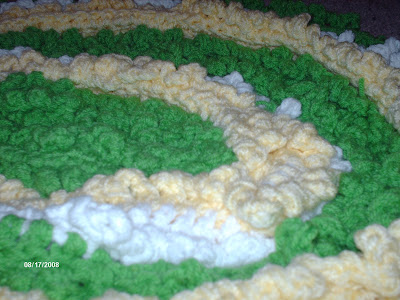
A close up of the stitches.
Doesn't it just brighten Micah's hideous room right up? I think it's cute! It may not be perfect, but I'm so proud of myself for sticking with it and accomplishing it! Michelle's is going to look even better (and probably closer to the pattern!).
Thanks for stopping! Lots going on this week on my blog, so stop back soon!

Thank you for the babysitters

I've been wanting to make some name frames for my nieces that always, always, always babysit (and love it!) my children during the week. When I go to Orange City every week to teach piano lessons, they watch them. Every single week. It's wonderful. I also teach them piano, so this way, we also have time for lessons every week and no one has to make a special trip. Win-win for everyone.
But, I wanted to make them something special. I helped paint their new room (they added onto their house) a month or so ago, and they painted it blue, green, and brown. It looks fabulous. I tried to coordinate with those colors, but I needed a little something more, so I added some pink (what teenager doesn't like pink?!). The girls are 15 and 16 years old.
Can you believe I whipped these up in 1 1/2 hours? Man, that Cricut was flying!!
I used a couple free fonts that I found off Font Freak online, and then just used my stamps and paper. They loved them. It's hard to tell, but I did clear emboss the rose and leaves in Katie's frame. Check the ingredients list for full supplies. My next post is going to be about my awesome rug I crocheted! See you then!
Katie's Frame
***ingredients***
Paper: SEI Chocolat, Tempting Turquoise, Gable Green,
SU! unknown dsp (I forget the name)
Stamps: Wild Rose
Ink: tempting turquoise, gable green
Other: cricut, sure cuts a lot, free font: Adine Kirnberg,
clear ep, wal-mart frame
****************
Marrissa's Frame
***ingredients***
Paper: SEI Chocolat, Tempting Turquoise, Gable Green
Stamps: Delight in Life
Ink: Tempting Turquoise, Gable Green
Other: cricut, sure cuts a lot, free font: boyzrgross,
stickles, wal-mart frame
****************

Monday, August 17, 2009

My New Clothesline!!

My darling husband just got my clothesline up a couple weeks ago. I use it for every single load I do, even the kids clothes! The only thing I don't hang up is socks and underwear (so the dryer runs for 30 minutes every week). Hooray!
Here it is in all it's glory. Three lines. I don't even have enough clothespins for the amount of line I have!!

I just thought this shot and the next were so cute. Looks like something people would hang up in their laundry room as wall decor!
Okay, this is the last post today. Seriously. You can go now. Thanks for stopping!!

Post it Note Holders

Okay, the first in hopefully many, many posts about the crafts fairs I am attending. Our first one is in Akron, IA on September 19. I'm getting closer every day...I don't feel quite as stressed as last year!
Here's the first things I have fully completed. They are post it note holders. Here's what I did:
1. Got an acrylic 4x6 frame at the dollar store for, you guessed it, $1.
2. Cut a piece of paper (after stamping if needed) to just under 4x6.
3. Placed in frame with the stand at the top. Used scor-tape to adhere to frame.
4. Used scor-tape to adhere post it note holder to frame.
5. Decorated as desired.
Very quick and simple, but should be great gifts for anyone!


***ingredients***

Paper: Flair Designs "Favorite Jeans", SU! Gable Green, Tempting Turquoise

Stamps:Verve- Circular Sayings

Ink: Gable Green, Tempting Turquoise

Other: scallop circle punch, circle punch

*****************

Quote says "The best teachers teach from the heart, not from just the book".
***ingredients***
Paper: SEI Chocolat, real red
Stamps: PTI Teacher's Apple
Ink: real red, versamark
Other: scallop circle punch, ribbon, circle punch, black ep
*****************


***ingredients***
Paper: Glorious Green, real red
Stamps:PTI Teacher's Apple
Ink: Glorious Green, Real Red
Other: scallop circle punch, circle punch, ribbon
*****************

***ingredients***
Paper: PTI Razzberry Fizz Remix, Lemon Tart
Stamps:Verve- Fluttering by
Ink: Pixie Pink
Other: scallop circle punch, circle punch, offray ribbon
*****************


Hello from Oz!

We got a wonderful package in the mail a few weeks ago. My friend Brittnee, who spent the past semester in Australia, sent us some souvenirs! Here's what she sent:


First, I got a super sweet bag with all the major cities on it. As you can tell, it's packed and ready to leave with us. I LOVE LOVE LOVE it.

Micah got a koala (I let Michelle choose for him). He thinks its okay.
Michelle chose the kangaroo and the key chain. She loves them both!! For a few days, they went everywhere with us! (the keychain still does)

This and the next few pictures are all a coaster set she found. They are aboriginal dot art painted by Maureen Hudson Nampajimpa. They depict the knowledge of the Dreaming (I think their creation story). I tried to find some information online, but it was very difficult. Brittnee said that the little horshoes are people, and the way they are placed is very significant. This is all I know.