First up is a card. I've been feeling bad for myself, because I sold my ink pads because we need money (so buy my stuff! :) ) and now it's like I don't know how to stamp without them! Well, I had the BRILLIANT idea to use my pastels (which I hardly ever use)! Here's the product:

I just got my new Guidelines set by Papertrey Ink, and I LOVE it! I finally worked up the courage to use it, and I love the result! I stamped the design on versamark onto the Orchid Opulence paper. The pastels come in on the main image. I stamped the flower spray in versamark, and then colored it with pastels. I also just realized that I can erase the pastels with the eraser that comes with them (and I've had these for several years now). Excellent!
Gone is the excess!
Plus, I'm super excited about the new PTI Birthday Basics set I got from a trade on SCS. It's got lots of birthday sentiments, plus happy birthday written in different fonts and sizes. I love it!
***ingredients***
Paper: Orchid Opulence, unknown green
Stamps: Verve Because of You, PTI Birthday Basics, PTI Guidelines
Ink: versamark
Other: stampin' pastels, HL ribbon from my mom
****************
And now for my super awesome project I was talking about last week. I'm pretty sure I'm going to be making more of these (if only for myself!)
Here are the details:
1. My mom picked up a flyer at HL that had an idea to use glass plates and decorate them.
2. She asked me to do it. I, of course, said yes.
3. She bought me a 10 inch plate and an 8 in plate. This is the 10 incher.
4. I printed off the picture using matte medium weight photo paper with my inkjet.
5. I used a 10 1/4 in. dinner plate to make a circle. From that circle, I measured 1-1/2 in. in on each side and top and bottom. I then used a pyrex mixing bowl (approx. 7-1/4 in. round) to cut a smaller circle from the big one.
6. I cut the outer ring into four somewhat equal pieces. Using GREAT care and precision, I mod podged everything on- first the inner circle, and then the outer four pieces. In hindsight, I would have modpodged the outer pieces first. I am slightly unhappy with the seams showing, but my husband assures me that you don't even notice. (This appeased me a little bit)
7. I cut the letters from my Pooh Font cricut cart, size 1-1/2, marker application. Modpodged those on.
8. Cut the picture into a 5x7 oval, and then matted it. Mod podged it on. I did a test run with the picture to make sure it wouldn't smear- it didn't even act like it would!!
9. Thought about adding bows. Decided against it. Husband agreed.
10. Stuck a piece of white c/s on the back with the ages of each child in the photo. I plan on making one of these plates for each year since the first grandchild was born.
11. Perfection! Just WAIT until you see what I have planned for the little plate!
Good night! Thanks for stopping!

 I began making this box. I used PTI's Dark Chocolate paper (which I love!) and followed the instructions for the faux leather look:


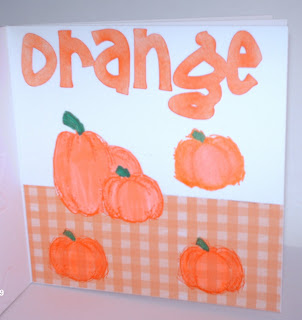
 I designed the cover using my Cricut. In fact, almost all the color pages used my cricut. I first cut out the words using Sure Cuts A Lot (SCAL), some software I bought for connecting my Cricut to the computer. I then sponged heavily over each word, using the appropriate color ink. Then, I chose some patterned paper to go with the color. Finally, I cut something on my cricut that went with the color. How do you like that tractor? It's my finest achievement! I found it on Susan Blue Robot's web page (Awesome page, by the way). Winnie the Pooh is from my Cricut cart, as are the leaves and Piglet. The horse is from a freebie I found online, and the cat is from a dollar download from a website online. The pumpkins are stamped from an SU! Stamp set called Autumn Harvest, and colored with plain old markers.


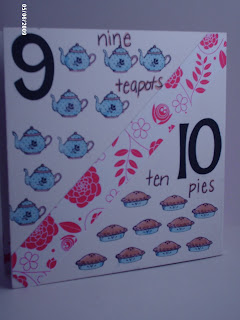
 Now, onto the number segment. While I was really picking up speed, the numbers took me way longer, because I stamped and colored everything. First, I once again cut the numbers using SCAL. Then I chose some patterned paper for dividers (PTI Razzberry Fizz), and then started stamping!


 1/2: Loads of Love; 3/4 Unfrogettable; 5/6: Delight in Life, Both Ways Blossoms; 7/8: Very Punny; 9/10 Love Bakes (all SU!)
 This card is for Mojo Monday's Sketch. It's a prize week, so I tried extra hard to make a super cute card. I LOVE this color combination together- I'm really loving PTI paper and the Razzberry Fizz pack. The yellow is so much more lemony in real life. My camera just doesn't so justice. *sigh* Someday, I will have a better, cooler camera!
 Second card. This one is for Viva La Verve's sketch challenge this week (June Week 1) with a twist of 3: 3 colors, 3 embellishments, 3 stamp sets. This one was tough. Again, I used PTI colors and paper *love it*. Check it: the ribbon was found deep in the abyss that is my ribbon drawer--I got it with my first Verve order; Julee included this ribbon and some gorgeous satin chocolate ribbon. This ribbon matched perfectly!!